Do It Yourself

7708 readers
1 users here now

Make it, Fix it, Renovate it, Rehabilitate it - as long as you’ve done some part of it yourself, share!

Especially for gardening related or specific do-it-yourself projects, see also the Nature and Gardening community. For more creative-minded projects, see also the Creative community.


This community's icon was made by Aaron Schneider, under the CC-BY-NC-SA 4.0 license.

founded 2 years ago
MODERATORS
1


Hi all,

Recently got myself a popcorn maker from the thrift shop that unfortunately refused to work. Wanted to try and get it operating as it should again, but it seems the issue wasn't so much something being broken in the machine, but rather extremely cheap build quality.

Repairing the thing just didn't seem worth it, so I disassembled it and am recycling the individual parts. However, I am thinking about making a toolbox so that I can learn some repairs and all, and am hoping to save the screws that I've salvaged from the machine.

My question is this. How does one sort and categorize the screws they keep? Are there codes the screws have, or does it come down to personally measuring and determining the length and type of screwdriver needed for them? Currently just keeping them in a sandwich bag for the time being.

Thanks for any help in advance.

2
3


Me challenging myself to purely purchase second-hand goods has once again hit a bump in the road with my recent purchase of a bookshelf at the thrift shop.

The bookshelf itself is fine, it looks nice, it was cheap at $25 CAD, and doesn't seem to have any damage to it. However, what wasn't advertised was the fact that the three shelving pieces taped together that rested on top of the shelve in the middle, uhhh, didn't have the holes drilled in yet that would allow for me to attach them to the rest of the unit.

Everything is perfectly fine save for that, so I don't want to toss the bookshelf entirely. If I wanted to prepare the shelving pieces myself to hang them into the adjustable holes, how would I do so? What tools would I need? Since I've never done anything like this before, would this be a good starter project, or should I have someone more experienced do it for me?

Thanks for any help in advance.

4


cross-posted from: https://lemmings.world/post/11714128

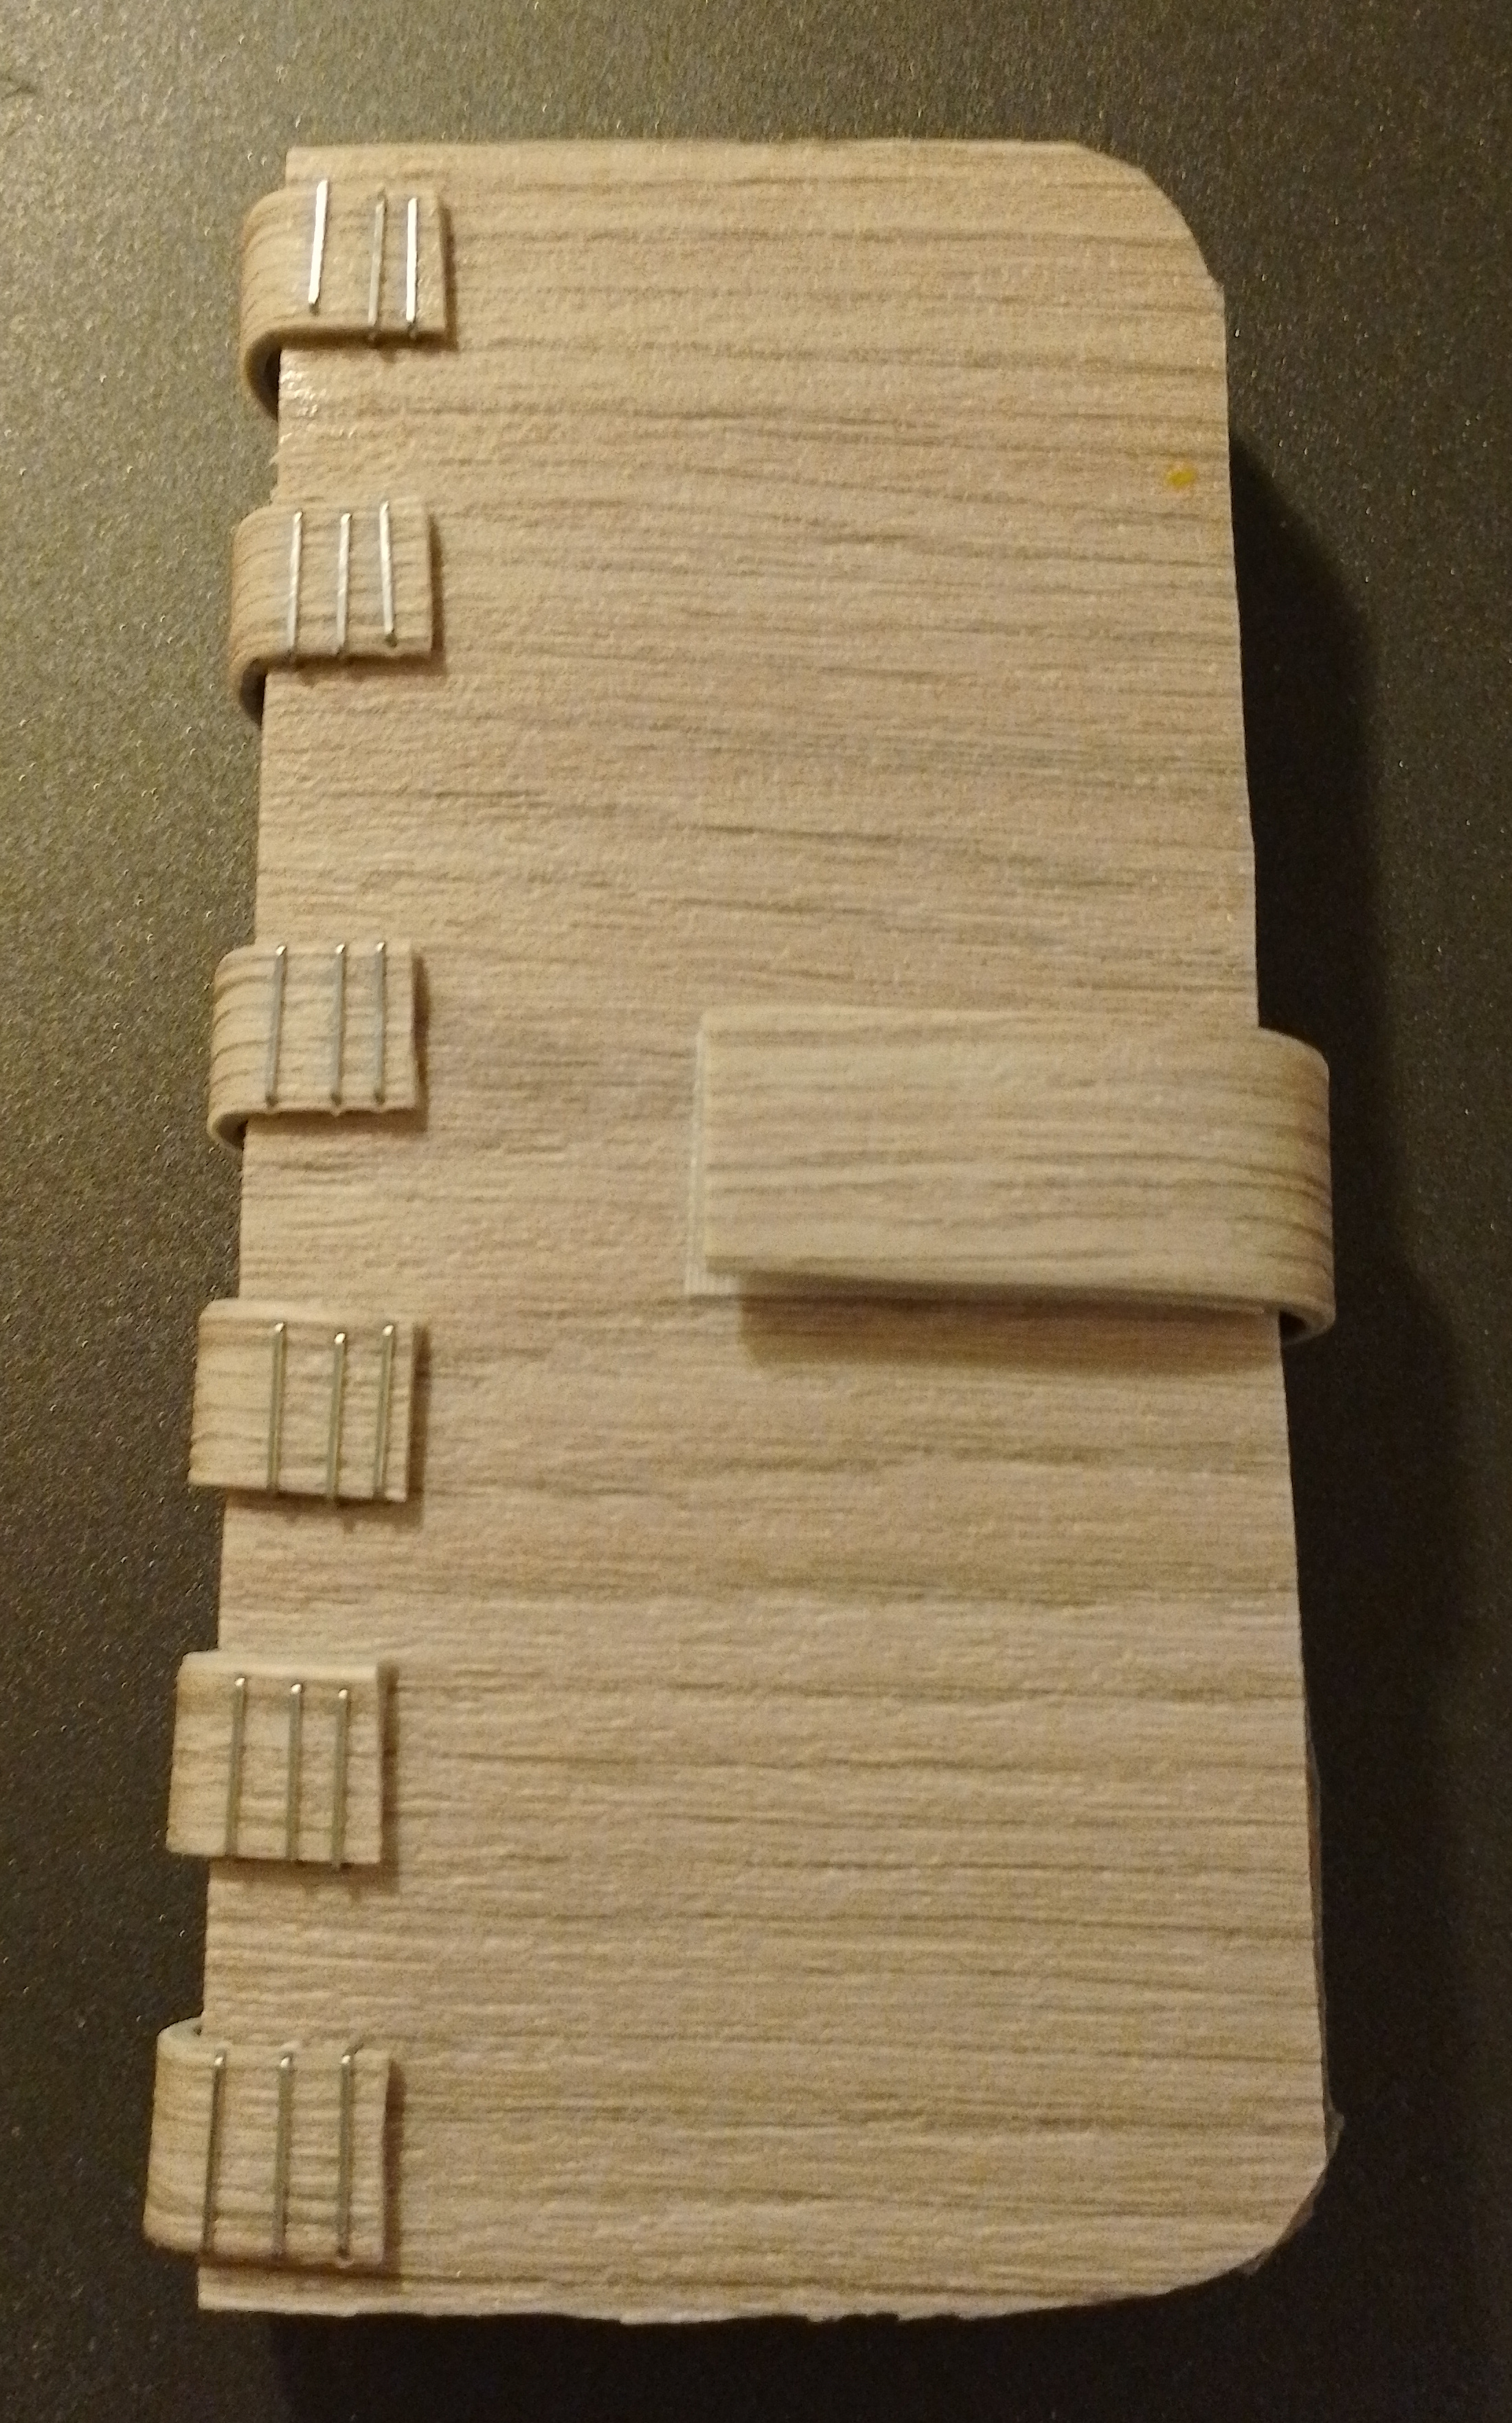
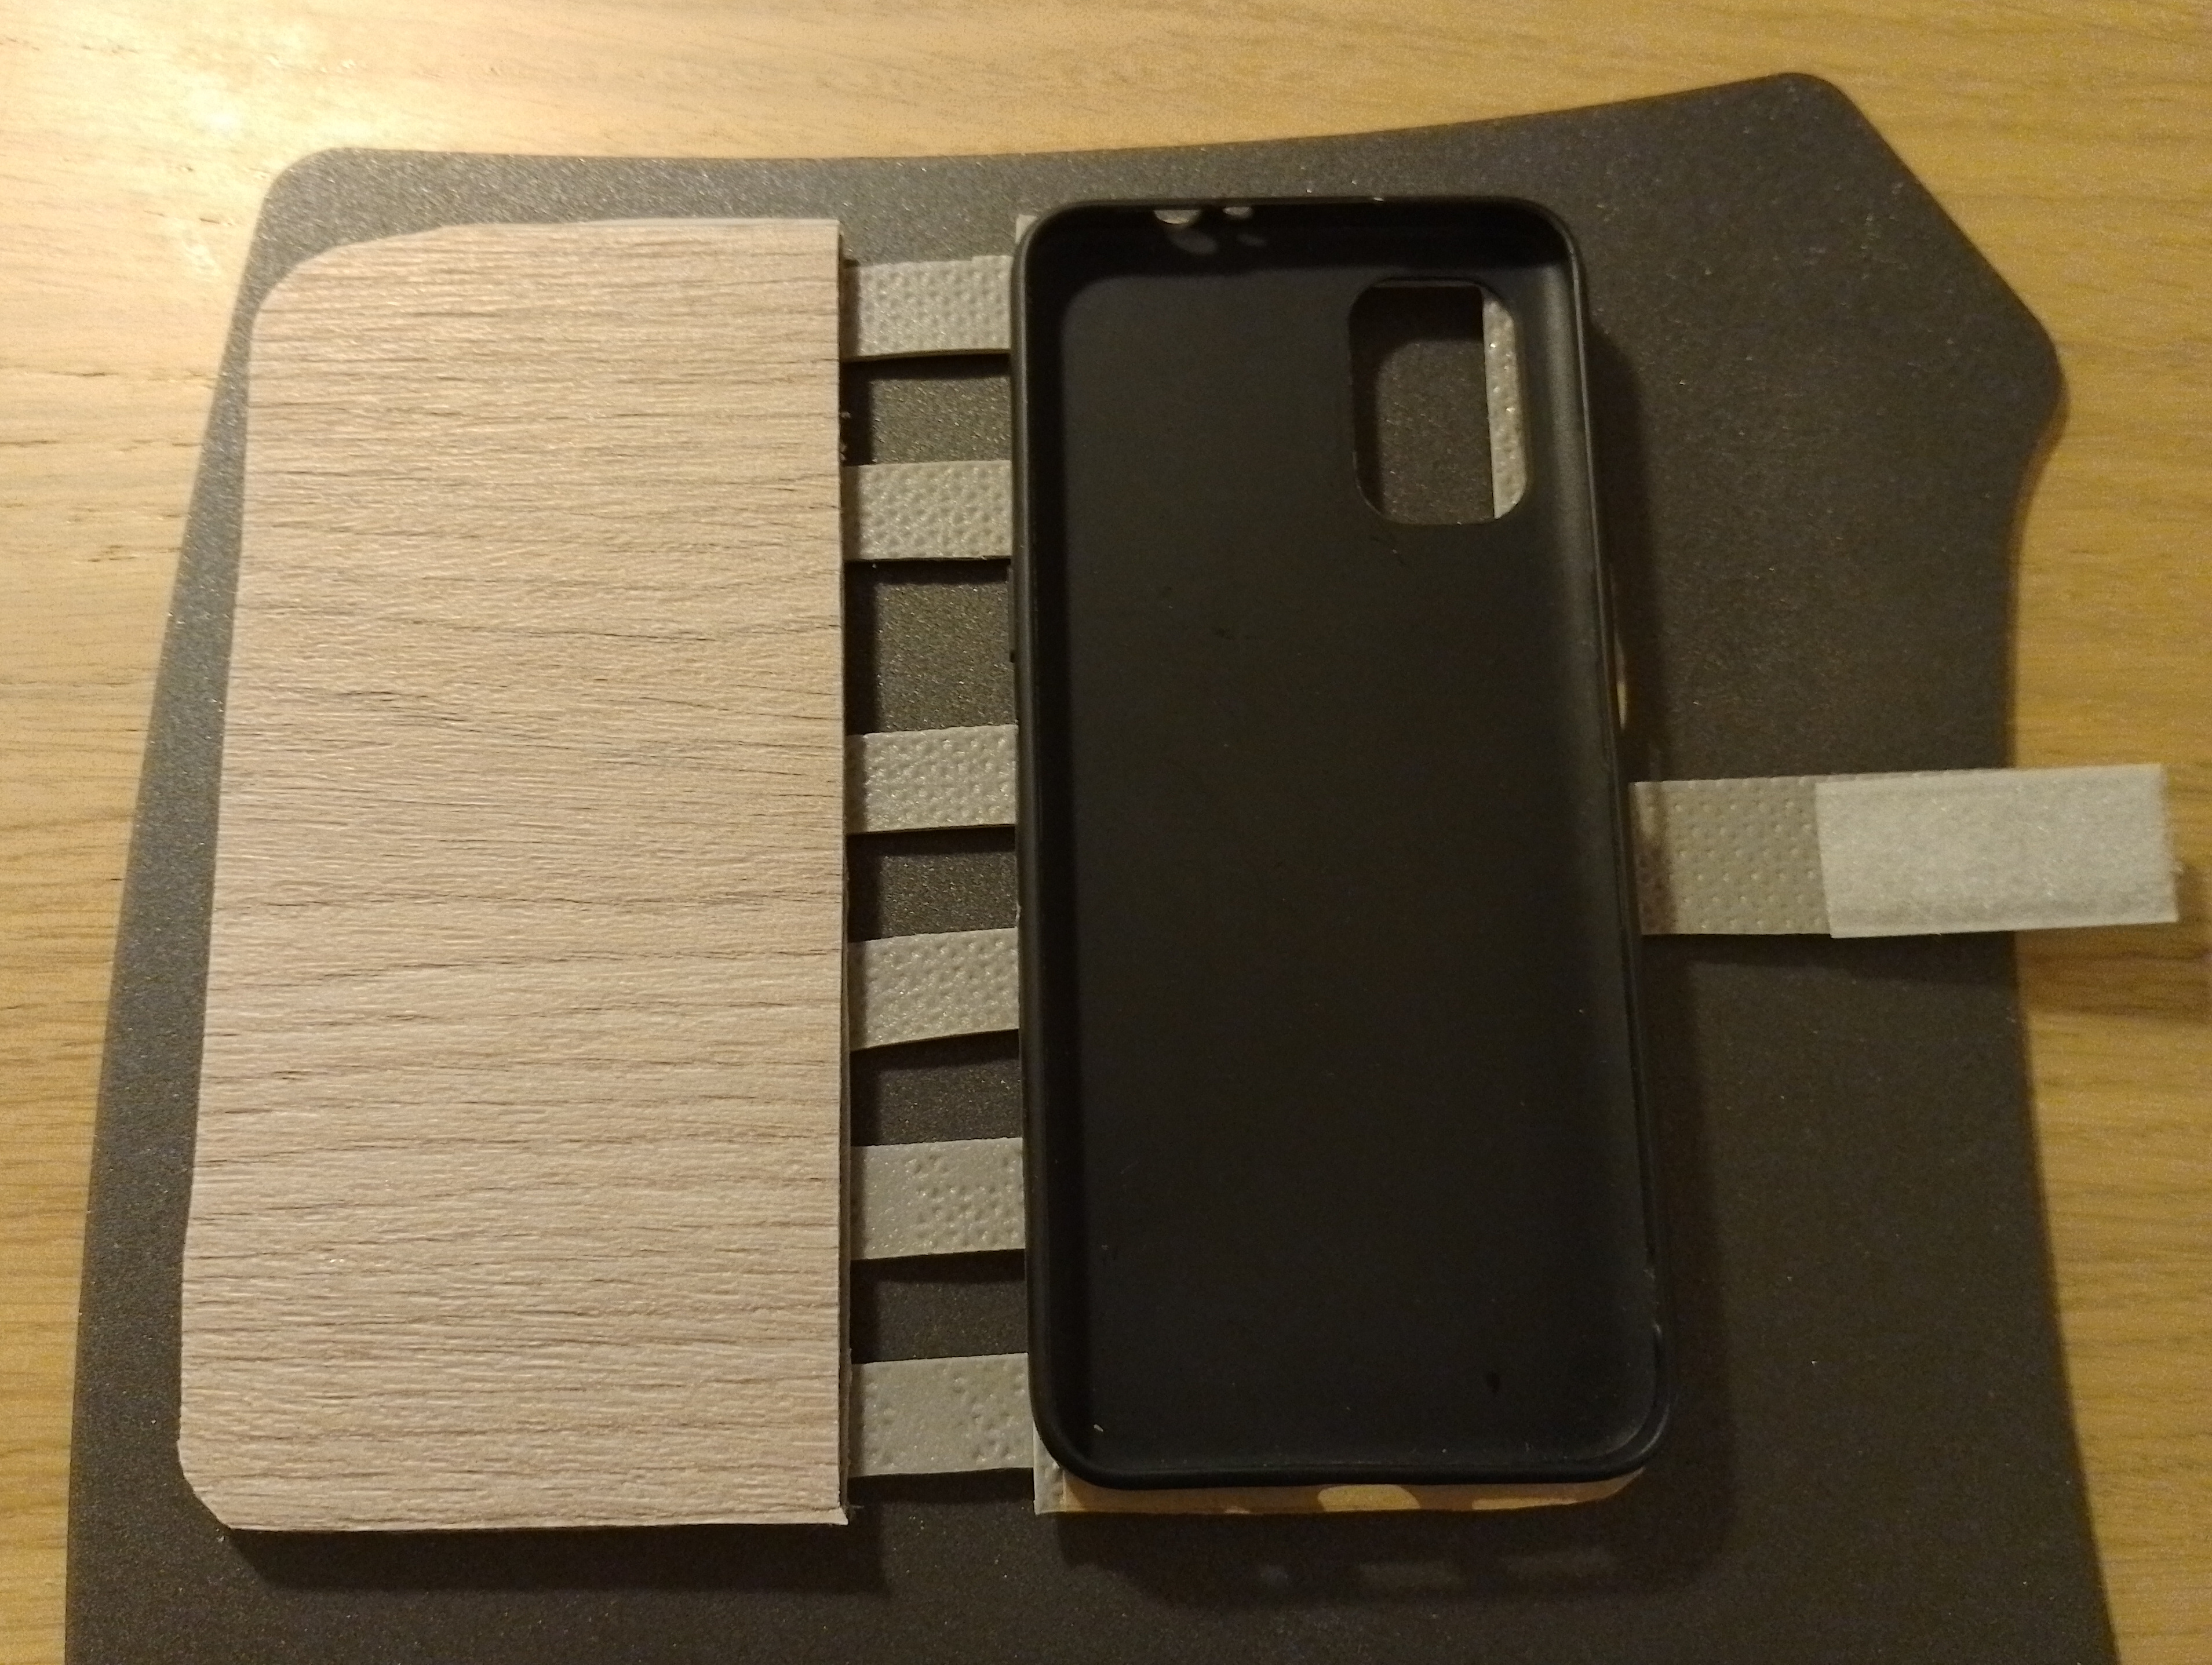
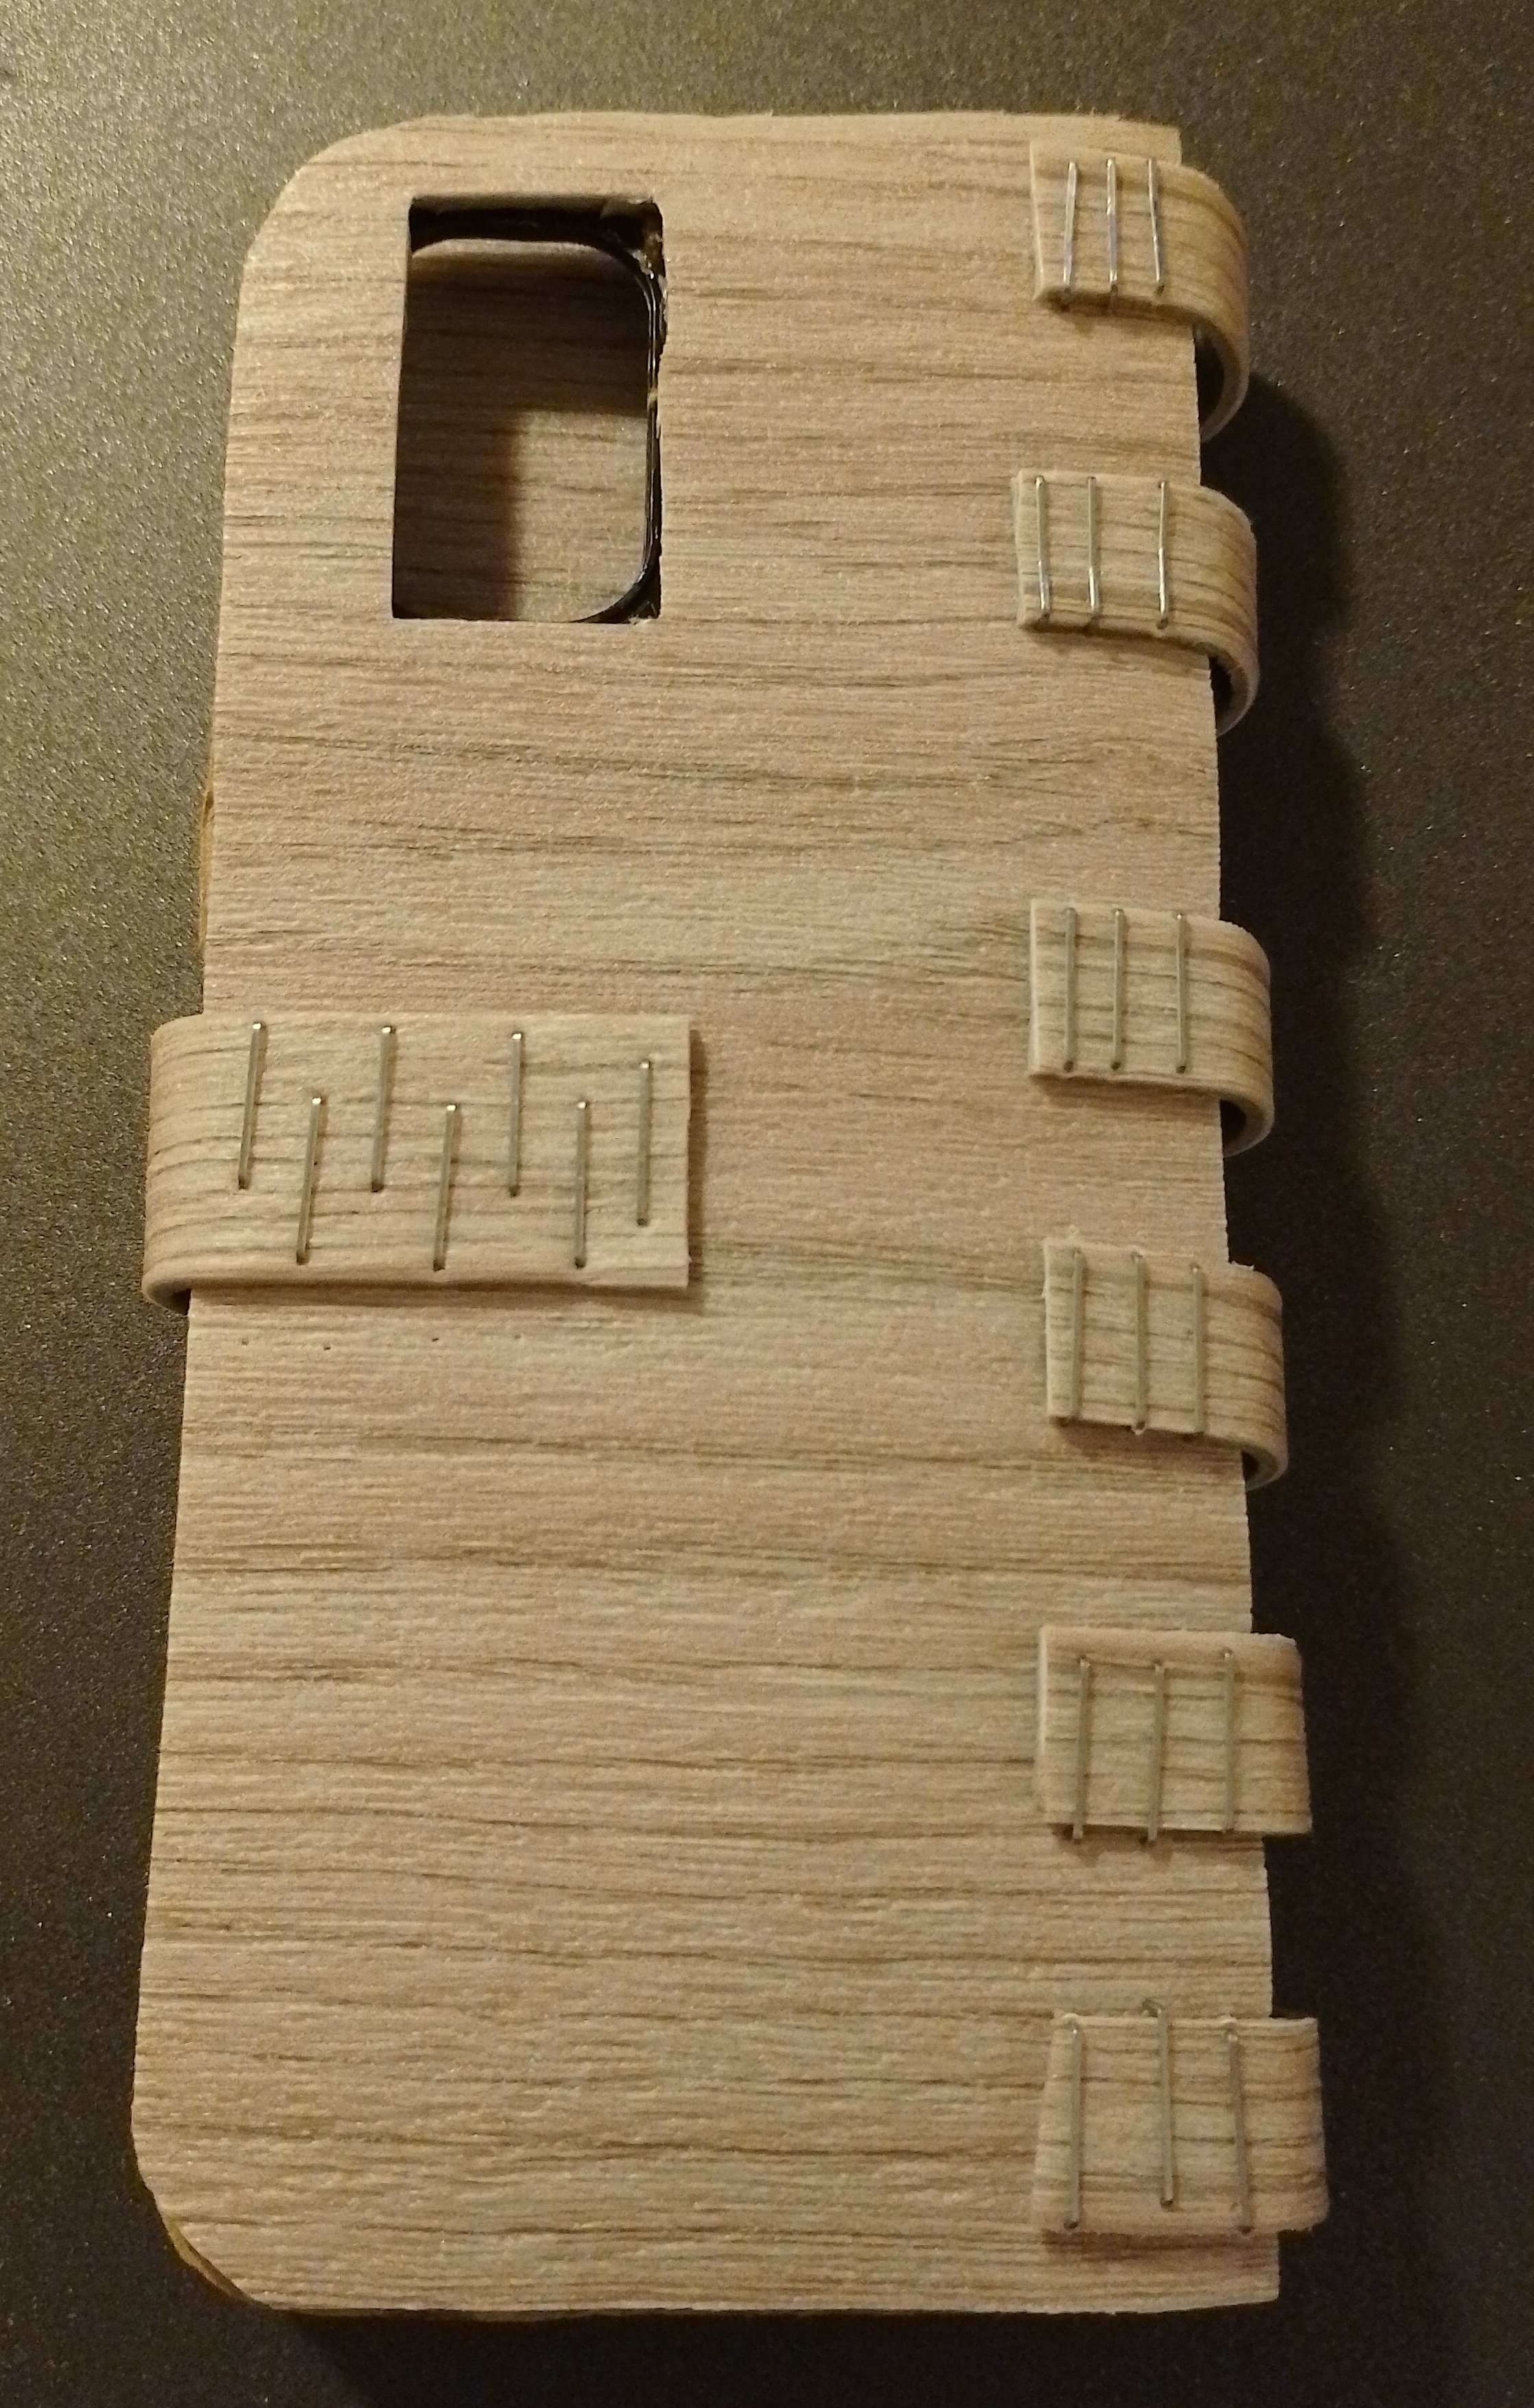
I tried to make a phone "wallet" case. I used the inside of my old one (what you press your phone into), cardboard from a an old box and some leftover vinyl flooring. I originally wanted to glue everything but ended up stapling some bits. these pics where hastily made and don't do the thing justice. Let's see how well this holds up (I seldom have it in my pocket so that helps).

5


I have an overhead light in my bedroom that I absolutely despise. It's way too bright and it's right behind my phone/book/whatever when I'm lying in bed. We have other lights around the room, and so I'd like to replace it with someone else. I don't really want a ceiling fan there, but that's the only thing I can think of. Does anyone have suggestions of something fun to put in the center of a bedroom ceiling?

6


cross-posted from: https://slrpnk.net/post/11339091

My bathroom tub fixtures have seen better days. Pretty sure they're original to the house (~60 years). We have fairly hard water, and the prior owners were not the best at maintenance so no clue how long these slow leaks have been going on. But the shower handle is stuck hard on the valve, and the bath spigot is crumbling away and similarly fused in place. Hot and cold come off easily.

Does anyone have any tips for freeing the one handle and spigot? I've tried light tapping with a mallet on the back of the handle to no avail. The spigot seems bound pretty tightly, to the point where I'm concerned about damaging the pipe if I apply too much torque.

As for the leaks, I haven't decided if I'm going to just replace the valves, or try fiddling with/replacing the packing nuts. This is my first time messing with plumbing, but either way seems straightforward enough after watching a few videos.

Any tips/tricks/suggestions appreciated, thanks!

7
39
submitted 3 months ago* (last edited 3 months ago) by [email protected] to c/[email protected]


Hi everyone!

A slow week went by, with daily heavy rains it's not always easy to find the motivation to work outside.

We installed a 50 square meter fleece and pond liner on top of the build, and started backfilling with dirt.

It's a lot of work because we have to dig the overgrown pile of dirt that's been sitting for 5 years on our lot, first getting rid of the roots in the top soil. But we have to do this manually as the back is only reachable through a narrow path in our neighbor's garden.

My partner also installed the electrical panel with 24V circuits for RGBW LED strips, a PoE WiFi access point and connected the wall outlets to the 230V main. It was temporarily connected to test how bright the strips will be. They will later be mounted in metal railings across the whole length of the lower brick line, with a wood cladding.

We will then have to dig a 20 meter trench from the house main electric supply, lay a PVC pipe and pull a 3-phase copper line to the cellar. This will be the garden hub to provide electricity to the future outdoor kitchen.

The next few days we will work on the mortar joints, using the multitool diamond blades that arrived in the mail to finish the cleanup before grouting all the joints cleanly.

Have a great week and keep on doing it yourself!

8


jerk-sock

jerk-sock on a vacuum


old car

old car


perfectly good tennis balls

perfectly good tennis balls


dry wall

dry wall


sharp blades

who needs sharp blades anyways


art degree

art degree


Any more suggestions?

9
155
submitted 4 months ago* (last edited 3 months ago) by [email protected] to c/[email protected]


Hi everyone

It's been a while, I skipped a couple of weeks to get things going on our project!

Last time I wrote we had finished 3 slices of the roof. In the meantime, we finished the 4 next ones and completed the roof.

Eventually we were able to do a complete layer in one day, the second one on top the following day, and move the wooden structure the third day.

We held off laying the last slice to finish the front wall (and be eventually able to attach the ceiling to it), making a door lintel out of cinderblocks and reinforced concrete.

The suspense was high whether we would have enough bricks to finish the project and it turned out we had just 3 extra at the end!

One of the bricks revealed a handwritten signature which turns out to mean "Ludwig Herman". We are still investigating who and when :)

Next, we will spend many hours cleaning the grout from the inside to free the bricks and make nice regular joints. Then we will insulate the outside with a pond liner and cover the root cellar under a thick layer of dirt.

See you soon!

10
101
submitted 4 months ago* (last edited 3 months ago) by [email protected] to c/[email protected]


Hello everyone! Thank you for all the positive comments last week.

We managed to double the length of the vaulted roof, laying the 3rd and 4th slice, in four 3 to 4-hour sessions.

The bricks are from old dismantled buildings, still covered in lime cement and need to be submerged in water and brushed individually. My SO is doing the laying, and I'm cleaning + assessing each brick.

We also get better with putting a smaller amount of grout to avoid spilling, because it's going to be a lot of work to clean all the joints.

This week, we expect to be able to lay 2 additional rows, and next week do the last slice, finish the door lintel (new word!) and front wall.

Lastly, a picture of me, because you know, we're getting familiar in the c/Do It Yourself family <3 Have a great week everyone!

11


Decided to build something rather complex as a first project and it's proving challenging at ever step of the way, but I'm really proud of how it's turning out.

We'll have a lot of work to clean the joints but it's going to be worth it I think. Something for the generations to come, if it doesn't collapse :-)

12


cross-posted from: https://beehaw.org/post/13852616

Pretty cool guide.

The guy says that he only recently realized that cleaning isn't intuitive so people need to be taught. This is for people who maybe haven't been taught how to clean or want to freshen up on their skills :)

13


I'm almost wrapped up with filling voids, bark inclusions, and knot holes in the boards for the bookcase. If our garage was climate controlled I expect this process would have gone faster; the same could be said if I had more horizontal working space for staging and filling. Once everything is done curing I should be able to go back over each board with the finishing grits to reach 220 - after that it's cutting to have a plumb edge and to create the shelf supports.

Since we're popping the grain in between sandings (spraying lightly with water and allowing to dry, which swells the softer grain and allows for a smoother finish) I've been able to see what these will sort of look like once finished, but the small bits of epoxy that made it over the edges of some of these really make the grain look downright sexy.

14


My girlfriend's deck was built out of untreated pine that was never painted or sealed. I dont see anywhere that any wood is rotted or broken yet, but many boards are cupping from the humidity and temperature changes over the last 4 years. If I buy a few gallons of exterior wood sealant and brush on a few layers on top and bottom would that keep the wood from warping any further and protect it from rotting? Do I need to test that the wood humidity is below a certain threshold before sealing? Where can I get a tool for testing wood dryness? Does sealant brand make a difference? I've loved BEHR paints in the past, they do a great job, but there is a brand called READY SEAL that is much cheaper and I'm wondering if its worth the savings or if there is a reason it is cheaper. All advice is welcome. Thanks

15
16
submitted 8 months ago* (last edited 8 months ago) by [email protected] to c/[email protected]


I've got one of those big red 20-gallon parts washers. You know the one. I mostly clean bicyle parts, and most bicycle lubricants are not petroleum-based. They're usually plant or wax-based. The idea is that a water-based degreaser, like Simple Green, should have no problem cleaning the stuff. My experience is that Simple Green is much better at rusting my parts washer than it is at actually washing parts. It never really got my bike parts clean, and now I'm left with a very rusty old parts washer.

I plan on refurbishing this machine, which is a fair amount of effort, but that puts me right back at square one; An imperfect system, susceptible to rust, with a solvent that doesn't really clean anything.

I'm considering moving to a petroleum-based solvent of some kind, like diesel. Or getting five gallons of that Saf-T-Clean stuff, assuming it's still available.

My main concerns are:

  1. Fire hazard.
  2. The fumes shouldn't give me cancer or kill too many brain cells.
  3. It actually cleans parts.

What solvent are you using in your parts washer?

Edit: I just checked the pump spec, and it's only rated for water-based cleaners. So that limits my options.

16
17


Kind of a busy week otherwise but progress is progress. I put comments on each image in the album to explain reasoning, goals, and steps taken - if you haven't done much carpentry I hope they help; if you have done much carpentry I hope you'll share your expertise. I've been around a bit and done a few things but this is not what I would call my specialty. Still, I'll do my best to answer any questions folks might have, even if I end up invoking Cunningham's Law.

I should quickly note that our house was not built to the same kinds of specifications found nowadays. Hell, it's not even built to the specifications in my books about building which were published in the same decade it was built. Improvements like fully gutting to run proper 2x8 timbers just isn't in the cards, even though it's what I would do if we were building from scratch.

18
20
submitted 8 months ago* (last edited 8 months ago) by [email protected] to c/[email protected]


Not sure if I should post this here or over in Technology, but here goes.

So I need to run two Gigabit (or better) network cables from the main switch in the garage into another room.

The problem is that that room is a shelter (small bunker), which according to Swiss regulations means no holes in the walls, and the 'door' is an airtight 35cm thick slab of reinforced concrete and steel. So the only way into that room is a small conduit for electricity. There's no way two Cat7 cables fit into that conduit, and power and data cables are not allowed to share the same space anyway. That means the only viable option is fiber - and, considering the conduit's dimensions, only fiber without a connector will go through.

There are copper/POF adapters readily available (such as this one), and they would probably do the job. However, POF is effectively limited to ~1Gbit half-duplex. If I go through all the trouble of installing fiber, I don't want it to be inferior to the existing Cat7 copper cabling. If there's a multimode solution that doesn't require me to buy two four-figure Cisco switches and five-figure tools, I'd much prefer that. Has anyone here heard of such a thing?

19


Hello, I’m back again. A couple small questions this time, nothing major. But I do have a fun story to tell to explain one of the questions. I’ll put all the questions in bulk at the end though for those who don’t care.

For the story, I ran a new circuit for the lights in my basement. I got that project done fine and it works exactly as expected. But on the last step, when I hooked up the breaker I noticed the 15 amp single pole breaker above it had a white wire, not a black. Ok, not the biggest issue. I just need to figure out where it goes and reverse the wires on the circuit because I thought they had the black on the ground bar instead of the neutral. Instead the black wire went to a 20 amp single pole breaker. But it gets worse.

That side of the house has a lot of electrical stuff that doesn’t work. Several outlets, outside lights etc. it really could’ve gone to anything. But what it went to I wasn’t expecting. We have an electric radiator in our bathroom that hasn’t worked since moving in. I never payed attention because even on the really cold days the bathroom stayed warm since the rest of the house is fine with heating. Turns out the radiator, which requires a 220v circuit on a double pole breaker, was wired with a 12/2 romex NM wire and wired to 2 single pole breakers…. So that’s disconnected now.

My question is, since the slots are pulled out of the panel can I leave these breakers in there not wired to anything? What is the proper way to close those up?

Also, I took out some fluorescent lights and moved them from the window to the center of the room. In doing so I have a good bit of extra cable. It’s not Romex, but it is 600v NM cable. It’s the black rubbery coating. Is it worth saving this in case I need wire for a spare project or is there some kind of risk to using the old cable?

20


I'd like to build a carport. It will basically just be a shed roof extending off the front of my garage. I'll need a beam, as thin as possible, to span 22 feet from side to side.

It looks to me like steel is the only thing that could easily do that, but the cost is high, and how thick does it have to be? I priced out some 6" i-beams. $500 each. How do I attach wood to those? Can't exactly nail into them.

That brings me to LVLs and such. Less pricey, but very thick. I suppose I could double up on a couple of thinner ones (like 6") but they don't seem to be rated for exterior use, and I'm pretty sure a carport would be considered exterior use, even though they'd be under a roof.

Any guidance?

21
20
DIY smartphone? (lemmy.dbzer0.com)
submitted 8 months ago* (last edited 8 months ago) by [email protected] to c/[email protected]


I am looking to building my own phone from a SBC running a linux distro with plasma mobile and that can make calls. and I have some questions:

Where can I start?

Which SBC to choose?

How would I achieve the call functionality?

22


We finished the last piece of the cat path I posted about earlier! This one goes from the laundry room, to the stairwell, and then into the guest bedroom on the upper floor (yes, I know the carpet needs replaced in that closet). They are already using them and seem to love the new path already.

https://imgur.com/a/QExCWgN

23


tl;dr: Neighbors' galvanized fence is upside-down and very sharp and pokey. How can I make it not be?

To start with, the neighbor is almost never home and therefore hard to contact. Also, they only bought their property last year and probably don't even realize they own the fence. Anyway.

As you may know, galvanized fences have a top and a bottom. The bottom has sharp bits which dig into the ground while the top is more rounded off.

When I bought my house, there was already a galvanized fence in place between my house and my neighbor's. I'm no fan of these fences in particular, but that's fine. Except that I later noticed that it had been installed upside-down, meaning that the top of the 3-ftish fence is covered in sharp spikes, while the safe end has been buried underground.

When I was younger, I had a dog who had her belly horrifically torn open while jumping over an upside-down galvanized fence, and I have two dogs, so this is a serious concern of mine. While my dogs have fortunately never tried so far, a dog could die trying to jump over a fence like that.

Question is, what can I do about it?

I would offer the neighbor for me to pay for it to replace the fence, except for the fact that we are on a serious and convoluted grade and it is no small matter to replace a fence. Because of the grade, there's no way for me to put up a second fence on my side (trust me, it would require some serious landscaping to do that, in the tens of thousands of dollars--we're on a hill).

So I feel at a loss except for to try to cap off the sharp tops of the galvanized fence, and my searching suggests that there is no pre-made product for this because this fence was just installed wrong.

Any advice?

24


tl;dr: Neighbors' galvanized fence is upside-down and very sharp and pokey. How can I make it not be?

To start with, the neighbor is almost never home and therefore hard to contact. Also, they only bought their property last year and probably don't even realize they own the fence. Anyway.

As you may know, galvanized fences have a top and a bottom. The bottom has sharp bits which dig into the ground while the top is more rounded off.

When I bought my house, there was already a galvanized fence in place between my house and my neighbor's. I'm no fan of these fences in particular, but that's fine. Except that I later noticed that it had been installed upside-down, meaning that the top of the 3-ftish fence is covered in sharp spikes, while the safe end has been buried underground.

When I was younger, I had a dog who had her belly horrifically torn open while jumping over an upside-down galvanized fence, and I have two dogs, so this is a serious concern of mine. While my dogs have fortunately never tried so far, a dog could die trying to jump over a fence like that.

Question is, what can I do about it?

I would offer the neighbor for me to pay for it to replace the fence, except for the fact that we are on a serious and convoluted grade and it is no small matter to replace a fence. Because of the grade, there's no way for me to put up a second fence on my side (trust me, it would require some serious landscaping to do that, in the tens of thousands of dollars--we're on a hill).

So I feel at a loss except for to try to cap off the sharp tops of the galvanized fence, and my searching suggests that there is no pre-made product for this because this fence was just installed wrong.

Any advice?

25


Hello, I’m back with another question. Everything a read is telling me yes I can, but it really does not feel right so I’m gonna ask here for good measure. Can I run electrical wire through fiberglass insulation?

In several rooms upstairs the wire comes out of the center of the ceiling then goes across to the window where a fluorescent tube light is installed. Below all that is a drop ceiling tile with insulation packed on top of it. I want to take the fluorescent light out and put a normal light back in which is easy enough. My concern is running the wiring through the insulation. Everything says running it through insulated walls is fine and the insulation itself says it’s non-combustible. But can someone confirm that I’m reading the right stuff?

There’s a gap between two pieces of insulation that I want to run the wire between. Picture attached. Not sure how old the insulation is if that is important.

view more: next ›